In this how-to post, I’m documenting the process I use to claim websites on Pinterest – when I’m setting up or re-optimizing an account for clients.
I’m purposely keeping this post pretty straight to the point. (It might even be a little dry… Sorry. It was hard to interject humor into this one. So I just aimed to make it helpful!)
But, just in case you’re looking for some additional (and possibly more entertaining 😉 info about setting up Pinterest for your coaching or service-based business…. Here are a few related posts you could also check out:
- Pinterest Business Account vs. Personal Account (+ Convert or Start New Quiz)
- New Pinterest Cover Photo Size (+ Free Canva Template!)
- Choose a Pinterest for Business Profile Name that Attracts Clients
- How to Clean Up Your Pinterest Boards to Attract Coaching Clients
Okay now, if you’re here to learn how to claim your website on Pinterest, read on for… (You can click on any of these to jump to the section most relevant for you.)
- How to Claim Your Website on Pinterest (for WordPress)
- How to Claim Your Website on Pinterest (for Squarespace)
- What if 24 hours go by… And your website still isn’t claimed on Pinterest?
Let’s dive in!
How to Claim Your Website on Pinterest (WordPress)
Step 1: Get prepared and gather what you’ll need.
If your website is on WordPress, you’ll need to copy a piece of code from your Pinterest account – and head to the WordPress dashboard to place that code on the back end of your website.
The easiest (and most reliable way) I’ve discovered to do this is by using the free plug in called “Yoast SEO.”
If you don’t already have Yoast added, go to “Plug ins” and then “Add New.” Then simply follow the instructions to add the free version of Yoast.
Keep your WordPress tab open, and open Pinterest in a different tab. (Be sure you’re logged in.)
Step 2: In Pinterest, copy the piece of code you need.
To get the code you need to claim your website on Pinterest, go to your “Settings” on Pinterest. (“Settings” are currently available by clicking on the drop down arrow next to your profile photo in the upper right corner of your screen.)
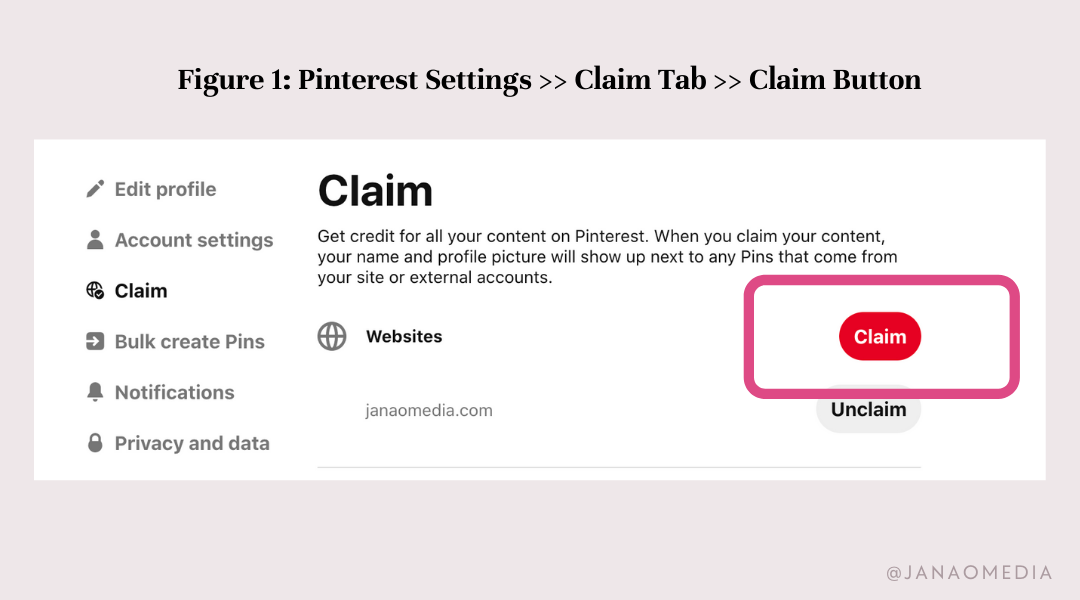
Click on the “Claim” tab within Settings. (See Figure 1.)

In Figure 1 above, you’ll note that I already have one website claimed. If I wanted to claim a second website, I’d click on the claim button and follow the process as follows.
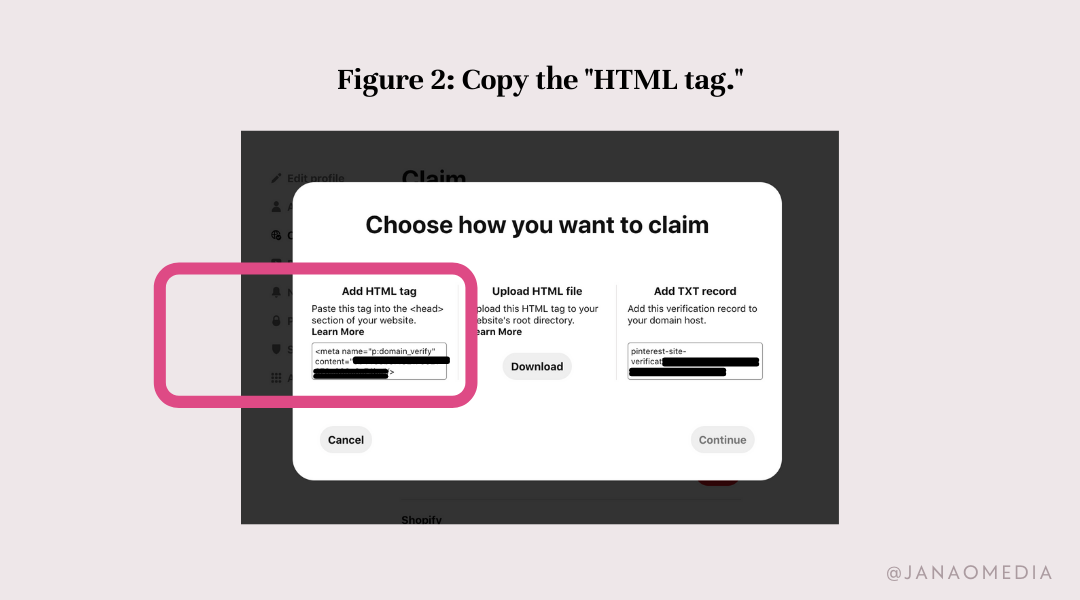
In the Claim tab, when you click on the red “Claim” button in the “website” area, you’ll see a window pop up with three options for adding the code.
We’re choosing option one, so go ahead and copy the HTML code. (See Figure 2.)

Step 3: Back in WordPress, add the code to the Pinterest
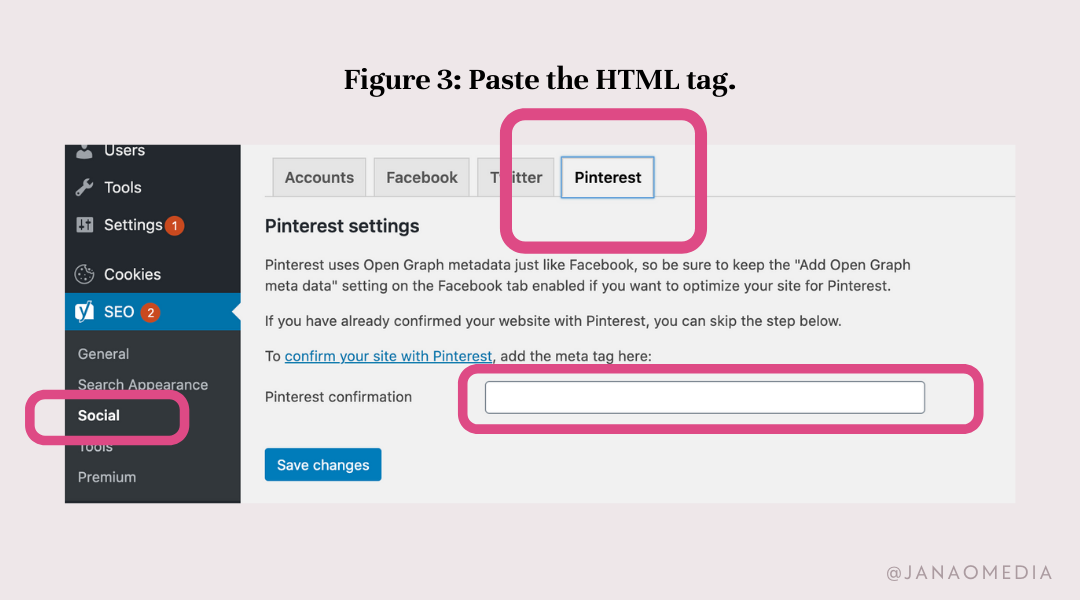
Back in your WordPress dashboard, head to the “Yoast” plug in along the left-side menu. Then go to the Yoast “Social” area. And finally, go to the “Pinterest” tab of the Social area. (See Figure 3.)
You’ll paste the HTML tag (that you copied from Pinterest) into the “Pinterest Confirmation” field, and hit “Save changes.” (Note the HTML tag will change a bit, in terms of how it appears, after you hit save. This is normal!)
And then… one last thing: Head back to Pinterest and hit “Submit.” You should see a message that tells you to hang tight – and that your site should be claimed within 24 hours. (Sometimes it takes just a few minutes; other times it takes longer.)

How to Claim Your Website on Pinterest (Squarespace)
At the time that I’m writing this blog post, it’s been a hot minute (maybe a year?) since I had a Pinterest set up project for a client on Squarespace. (Most are on WordPress, a few have been on Kajabi.)
So, for now, I’m going to:
- list the simple steps to connect your Squarespace website to your Pinterest
- link you to the Squarespace help video showing you the steps
- plan to update this blog post with some screenshots – next time I do a VIP Pinterest set up for a client with a Squarespace site!
Ready? The steps to connect your account are:
- Log in to Squarespace and select your website.
- From your Squarespace Home menu, go to “Settings.”
- Click on “Connected Accounts.”
- Click “Connect Account.”
- Choose “Pinterest” from the “Social Accounts” menu.
- Enter your Pinterest username and password – to log in and connect.
- Click “Allow” to authorize the connection.
- Click save.
Note: You’ll be offered the option to “push content to Pinterest automatically.” I strongly recommend against doing this. It’s important to be intentional about adding Pinterest-specific keywords to your pins, and about adding pins to the most relevant boards first… So for those and other reasons, I do not suggest allowing an “automated” push of your content.
It may still take 24 hours for your Squarespace site to be claimed on (or connected to) Pinterest, so hang tight!
Speaking of that…
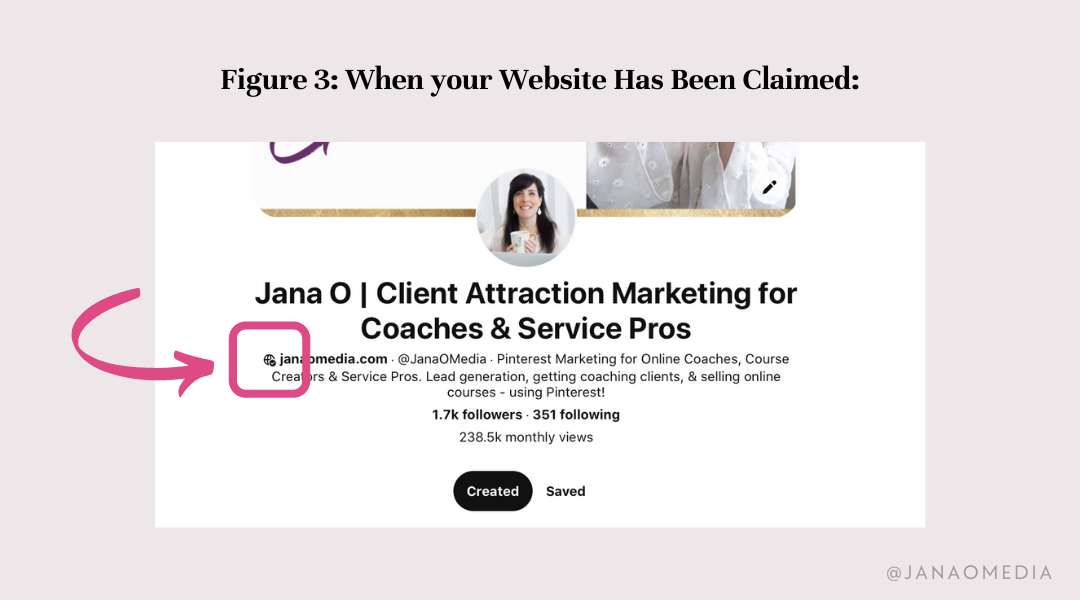
To Confirm You’ve Successfully Claimed Your Website on Pinterest…

What if 24 hours go by… And your website still isn’t claimed on Pinterest?
First, check to be sure that the website you’re looking to claim is the same site you’ve added to the Pinterest “Settings” area. (Sounds obvious, I know… but I’ve seen people try to claim a different site than the one they have there!)
If they match, and you’re sure you followed the steps above… your next step is to send a message to the Pinterest Help Desk.
In the message, be sure to include… (This is WordPress-specific.*)
- A statement that you’re trying to claim your website – and that you’ve followed the recommended steps, and it’s not claimed yet.
- A statement of how much time has gone by since you followed those steps (for example, “It’s been three days…”
- The full URL of your website
- A polite request (Say please!) for Pinterest to claim the site manually on their end.
- A screenshot (There is a place to attach it when you submit your question) that includes BOTH the full URL name, AND the Yoast tab where your HTML code has been placed and saved.***
*** Note: This last item (the screenshot) is super-important. It gives Pinterest help desk “proof” that you own the domain / website AND that you’ve placed the proper code on its back end. Including this screenshot with your message will cut out back-and-forth, show them you know what’s up 😉, and get you faster results.
Every time I’ve had to reach out for this reason, I’ve received prompt and helpful assistance from Pinterest. So, sit tight! They will help you!
(*And, by the way, I’ve never had a situation in which the claiming process on Squarespace didn’t work the first time, so I have no troubleshooting advice on that! Chances are, you won’t have any issues!)
You did it! Claiming Your Website on Pinterest Wasn’t Too Hard! 😉
If it was helpful, I’d love for you to pin this post to your “Pinterest Marketing” board to save in case you need it again – and to spread the word to others who might find it helpful, too! 👇


